Category Archives: libraries

ProtoMQTT::four()

glue it all together

In the last post I already introduced class RobotCtlr. It holds the defined protocol buffer data structure [1] as a class member as well as a reference to the mqtt client handle.
As a reaction to an incoming message the robot can move to a given position.

1
2
3
4
5
6
7
8
9
10
11
12
13
14
15
16
17
18
19
20
21
22
23
24
class RobotCtrl
{
public:
 
 RobotCtrl(std::string robotName);
 ~RobotCtrl();
 
 void setClient(MQTTClient &client);
 
 int move(std::vector<double> position);
 
 int publishMessage();
 
 static int onMessageArrived(void* context, 
                             char* topic,
                             int tlen,
                             MQTTClient_message *msg);
 
 
private:
 RobotMsg mRobotMessage;
 MQTTClient mMQTTClient;
 std::vector<double> mPosition;
};

publish me

To push a message to the connected broker we have to serialize proto message to a byte sequence which is taken over by the MQTTClient_message.
Proto buffers offers a bunch of methods for this task, e.g. SerialzeToArray (line 13,14) or if you prefer to convert to std::string first just use SerializeAsString() (line 16,17). Beforhand we set the current timestamp as described in the previous post [2].

1
2
3
4
5
6
7
8
9
10
11
12
13
14
15
16
17
18
19
20
21
22
23
24
25
26
27
28
29
30
31
32
33
34
35
36
37
38
39
40
 
int publishMessage( )
{   
 int rc = 0;
 
 ptime t0 = microsec_clock::local_time();
 std::string  timeString  = to_simple_string(t0);
 
 mRobotMessage.set_timestamp(timeString);
 
 MQTTClient_message pubmsg = MQTTClient_message_initializer;         
 
 mRobotMessage.SerializeToArray(pubmsg.payload,mRobotMessage.ByteSize());
 pubmsg.payloadlen = mRobotMessage.ByteSize();
 
// shown as example to serialize to std::string
 pubmsg.payload = (void*)(mRobotMessage.SerializeAsString()).c_str(); 
 pubmsg.payloadlen =(int)(mRobotMessage.SerializeAsString()).size();
 
 
if(nullptr != mMQTTClient)
{
 MQTTClient_deliveryToken dt =0; 
 std::string topic = "Robo/data";
 rc = MQTTClient_publish(mMQTTClient,
                         topic.c_str(),
                         pubmsg.payloadlen,
                         pubmsg.payload,
                         pubmsg.qos,
                         pubmsg.retained,
                         &dt);
 
}
else
{
    rc = -1;
}
 
return (rc);
}

In this case the mqtt message is send in qos (quality of service leves) zero, which leads to a fire and forget behaviour that means the message won’t be acknowledged by the receiver or stored and redelivered by the client. A good summary of qos can be found at [3].

someone´s calling

The clas RoboCtrl provided a static method onMessageArrived which has to be registered to MQTT subscribe notification see [4].
By casting the context void* parameter to a RobotCtrl object we can effectively use the method of the actual object.
The arrived MQTTClient_message can be parsed directly into a RobotMsg object by using ParseFromArray member function.

1
2
3
4
5
6
7
8
9
10
11
12
13
14
15
16
17
18
19
20
21
22
23
24
25
26
27
 
static int onMessageArrived(void* context, char* topic , int tlen, MQTTClient_message *msg)
{
 RobotCtrl *parent = (RobotCtrl*) context;
 
 std::string _topic(topic);
 RobotMsg _msg;
 
 _msg.ParseFromArray(msg->payload,msg->payloadlen);
 
 std::vector<double> p(_msg.position_size(),0);
 
 memcpy(p.data(),
       _msg.mutable_position()->mutable_data(),
       _msg.position_size()*sizeof(double));
 
 
// setter with index and value 
//_msg.set_position(0,double(0.0);
 
// dynamically add element 
//  _msg.add_position(double(0.0));
 
 parent->move(p);
 
 return(1);
}

In this simple demo an arrived message is interpreted as a command to move to the new position in the included message.

accessing repeated fields of protocol buffer

The protocol buffer API provides direct access to the memory of repeated field (dynamic array) . So it is possible to copy all elements to a std::vector. This is done by calling mutable_data() of the repeated field mutable data member (line 13). In a use case where index based access is prefered one can use the set_position() call and/or add_positon() to add elements at the end of the buffer.
The commanded position is now processed by a call to the object move function.

let’s loop it

In our main function the only thing left is to subcribe to a message and then start a little loop to keep the process running, where we decide to send out the actual message every 500ms.

1
2
3
4
5
6
7
8
 
int ec = MQTTClient_subscribe(mqttClient,"Robo/Input",0);
 
for(;;)
{
  Sleep(500);
  robotControler.publishMessage();
}

With this post the small blog series about protocol buffers in combination with mqtt ends. Full source code can be found at [5].

references / further reading

[1] http://techblog.boptics.de/protomqttone/
[2] http://techblog.boptics.de/protomqttthree/
[3] http://www.hivemq.com/blog/mqtt-essentials-part-6-mqtt-quality-of-service-levels
[4] http://techblog.boptics.de/protomqttthree/
[5] https://github.com/vlovo/ProtoMQTT/
ProtoMQTT::three()

what´s the time

In the last two posts everything was set up to use protocol buffers and a example message was defined [1],[2]. The robot message contains a data field timestamp which is useful to check for the ordering of messages (if from the same source) or if implementing some kind of archival storage. By design this data field is defined as string, because it should be human readable and human interpretable in an easy way and second reveal some kind of standard. We follow ISO 8601 and use boost::posix_time from the Boost.Date_Time library [3]. The following code will demo how it is used.

#include "boost/date_time/posix_time/posix_time.hpp" 
 
using namespace boost::posix_time;
 
void demoPosixTime()
{   
 
  ptime t0 = microsec_clock::local_time();
 
  std::string  timeString  = to_simple_string(t0);
 
  std::string  timeIsoString = to_iso_string(t0);
 
  ptime t1 = time_from_string(timeString);
 
  ptime t2 = from_iso_string(timeIsoString);
 
  if( t0 == t1 && t1 == t2 )   std::cout << "t0 ,t1 and t2 are equal" << "\n";
 
  ptime t3 = from_iso_string("20161120T170143.558219");  
 
  if(t3 > t1 )
  {
	std::cout << " t3 is a new message \n";
  }
  else
  {
        std::cout << "t3 is a message from the past \n";
  }
  return ;
}

Just include posix_time.hpp and use boost::posix namespace for less typing. You start by constructing a ptime object from a clock. There are two clocks available which differ in time resolution. For example you can choose between microsec_clock or second_clock each promising different resolutions. Note: If you have strong recommendations for your time resolution please test first on your system !
From each clock we can get the actual time, for example local_time like in the example. A second option is universal_time() for getting UTC [4] There are two free functions available which convert the ptime object in a string representation. to_simple_string gives a nice readable notation of the time whereas to_iso_string encodes to more compact (5 Bytes less than to_simple_string) ISO 8601 string.
The reverse operation can be achieve by calling from_iso_string or time_from_string for simple_string. Unfortunately the API is not symetric by names in this case. Do not mix the operations ! To call from_iso_string whith a simple_string will lead to an error.

Now, the big advantage after obtain the ptime object from lets say a string, is that you can compare two time points, because operators a well defined for ptime objects.

setting up MQTT

First we have to create a MQTTClient handle with the library function call MQTTClient_create. We need to specify a serverURL which we want to connect later. For the moment this server , also called a broker, is a public accessable one at iot.eclipse.org with default port 1883. Note: there is no user / password auth and there is no security/encryption like TLS, so be careful about your secret robot messages. To identify the client we can put a clientID into that function too. It must not more than 23 characters utf 8 encoded string.For example we can use the mac adress of one of our networkadapters here.

#include  "MQTTClient.h" 
 
RobotCtrl robotControler("Kraftwerk"); 
 
MQTTClient mqttClient;
 
std::string  clientID=  "RoboClient"; // do not use colons inside
 
int rc = MQTTClient_create(&mqttClient,
                          "tcp://iot.eclipse.org:1883", 
                           clientID.c_str(),
                           MQTTCLIENT_PERSISTENCE_DEFAULT, 
                           NULL);
 
rc = MQTTClient_setCallbacks(mqttClient,
                            &robotControler,
                            0,
                            RobotCtrl::onMessageArrived,
                            0);

! Note: it turns out that any colon appears in the client ID the connectio to the broker will fail.

In case we want to receive a message (subscribe) paho lib can invoke a user defined callback. The callback has to set BEFORE the connection to the broker takes place.
Unfortunately the MQTTClient_setCallback methods accept a pointer to a function, so we can not feed in a function pointer to a member function of our object robotControler which is responsible for control the robot, use protocol buffer message and publishing to the broker.
So only global or static functions are possible for the callback. So the callback function can be implemented as a static function of our RobotCtrl class like this:

 
static int RobotCtrl::onMessageArrived(void* context, char* topic , int tlen, MQTTClient_message *msg)
{
 RobotCtrl *caller = (RobotCtrl*) context;
 std::string _topic(topic);
 if( "right_topic" == _topic)
 {
    // process message
 }
 return(1);
}

By casting the context pointer to our RobotCtrl , we can actually use the calling object to invoke its mehods here. I come back to that function later.
! Note: if you return 0 from this function the callback is invoked again. So a value not equal to zero indicates a successful message processing.

connect me

For the connection we need to populate the connectOptions struct. For convenience the lib provides default initalizer here.
In case of connection termination the client can send a last will, which is defined in the MQTTClient_willOptions. So any listener who subscribed to the topic “Robo/disconnect” will
receive the message “R2D2 disconnected” right away.

 
MQTTClient_connectOptions opts = MQTTClient_connectOptions_initializer;
MQTTClient_willOptions wopts = MQTTClient_willOptions_initializer;
 
opts.keepAliveInterval = 20; // client checks connection every 20s
opts.cleansession = 1;
opts.connectTimeout = 2;
opts.will = &wopts;   
opts.will->message = "R2D2 disconnected";
opts.will->qos = 1;
opts.will->retained = 0;
opts.will->topicName = "Robo/disconnect";
 
rc = MQTTClient_connect(mqttClient, &opts);

The connect function returns MQTTCLIENT_SUCCESS on success.

references / further reading

[1] http://techblog.boptics.de/protomqttone/
[2] http://techblog.boptics.de/protomqtttwo/
[3] http://www.boost.org/doc/libs/1_55_0/doc/html/date_time/posix_time.html
[4] https://en.wikipedia.org/wiki/Coordinated_Universal_Time

ProtoMQTT::two()

define what to say

The fundametal concept behind protcol buffers is to define a data structure containing all informations you like to involved. For this data structure a special format is used and it is defined in a so called .proto file.
After that the protocl buffer compiler translates this .proto file into a C++ class which is allows to access the data and in addition to that to do serializing/deserializing operations.
Because the .proto file kind of gerneral and descriptive they can translate to C#,Go,Java and Phyton out of the box , too.
That means once a common data structure or message is defined , different languages can talk to each other.
So lets jump into an example. Lets say we want to design a message a robot can send out to the world. Our .proto file RobotMsg.proto could look like that

message RobotMsg{
 
 required int32 messageId = 1;
 required string deviceName = 2;
 required string  timestamp = 3;
 
 
 enum RobotStates{
	  Unkown =0;
          Error=1;
          Connected=2;
          Idle=3;
          Moving=4;
      	  };
 
  required RobotStates robotState = 4;
  repeated double position = 5;
  optional int32  digitalInputBitMask= 6;
 
}

We see that POD types a available like int32 or double and composite types like enum , too. A dynamic array is defined by the key word repeated. Each data member is labeled by unique numbered tag.

forever or compatible

Sometimes it is neccessary to update your proto message by for example adding one data member. Therefore the keyword optional gives you the opportuity to keep things compatible in older versions. On the other hand the required keyword makes things stay forever. Data field with repeated keyword are optional by nature, because an array can have zero elements. In this case some robots do have a digital input extension, some have not so the bitmask is labeled optional.

I recommend to take a look at the offical protocol buffer documentation [1] for  in deeper readings.

let’s generate

If you we do not want to get in touch with the protocol buffer compiler by hand everytime we can make use of cmake integration. The followinng lines in our CMakeLists.txt will do the job.

PROTOBUF_GENERATE_CPP(PROTO_SRCS PROTO_HDRS RobotMsg.proto)
include_directories(${CMAKE_CURRENT_BINARY_DIR})

That means our RobotMsg.proto file is feed to the compiler and the generates two files: RobotMsg.pb.h and RobotMsg.pb.cpp. These files are accessed by PROTO_SRCS and PROTO_HDRS variables.
The generated files are placed into our build tree directory. Therefore it is very important to add the CMAKE_CMAKE_CURRENT_BINARY_DIRBUILD_DIR to out include directories. Of course we have to compile the RobotMsg.pb.cpp and add it our the project see full CMakeLists.txt on github  [2].

Hello Robot

No we ready to use our RobotMsg in our C++ code :

#include <iostream>
#include "RobotMsg.pb.h"
 
int main()
{
 
 RobotMsg msg;
 msg.set_devicename(std::string("R2D2"));
 msg.set_robotstate(RobotMsg_RobotStates_Connected);
 
 std::cout << "Hello Robot: size is "  << sizeof(msg) << "\n";
 std::cout << "Hello Robot: byte size is " << msg.ByteSize() << "\n";
 std::cout << "Hello Robot: " << msg.devicename()  <<  "\n";
 
 return(0);
}

Here we create the RobotMsg object on the stack and use setters/ getters for the data members we defined in the .proto file.

references / further reading

[1] https://developers.google.com/protocol-buffers/docs/proto

[2] https://github.com/vlovo/ProtoMQTT.git

ProtoMQTT::one()

In this series of blog post I am going to demo the combination of mainly two libraries / technologys which I came across recently and which I find very useful. I am going to use google protocol buffers (protobuf) together with MQTT ( paho mqtt lib). As the project evolves probably there will be other libraries to mention. My toolchain is as follows: CMake, Visual Studio 2010. The source code will be available on  my github repo [1]

building protocol buffers

We start with building protocol buffers. After downloading from their github repo [2] we find a CMakeLists.txt in the subfolder cmake.So we can run cmake-gui.exe and set the source dir to subfolder cmake.

Here are some hints:

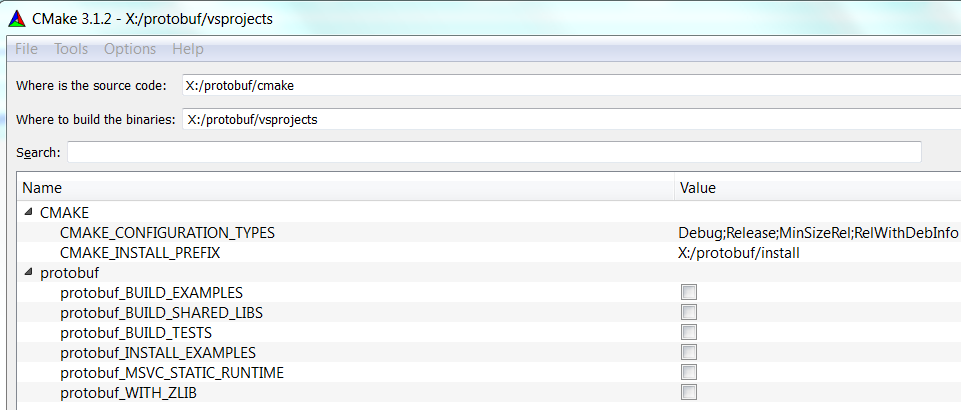
  1. I recommend to create build directory as a subfolder named vsprojects, because it turns out that if we would like to use the built in cmake command find_package the default behaviour  is directed to this exact directory.
  2. there is a default option to select static linking to MS runtime libraries, that can cause   trouble when linking to protocol buffers in own projects. I prefer dynamically linking to runtime.
  3. if cloned from github the build test option does not work, because of missing gmock framework

So my cmake settings looks like this.

protobuf_cmakegui

Then simply build release and debug configurations.

consuming protocol buffers

Conuming protocol buffers in your project is super easy. In our CMakeLists.txt we do

SET(PROTOBUF_SRC_ROOT_FOLDER "X:/protobuf")  
find_package(Protobuf REQUIRED)
include_directories(${PROTOBUF_INCLUDE_DIRS})

That means after giving a hint to the root folder , find_package does the job and gives us PROTOBUF_INCLUDE_DIRS and PROTOBUF_LIBRARIES variables. The letter one will be
used for linker configuration later on.

building paho mqtt library

After downlading from the github repo [3] it turns out that they have cmake support to build the library. Unfortunately the cmake project generation is broken for Windows as noted in pull request #141. In addition to that the build is broken on older compilers like VS 2010 due to a style mixed declarations as noted in pull request #183. You can find the corrected CMakeLists.txt and source files in subfolder patches/paho on my github repro.

There is the opportunity to build the paho mqtt lib with SSL support which requires openSSL, but for now I leave it out.

consuming paho mqtt c library

The library comes in two flavours. One of which supports synchronous and one which deals with asynchronous operation. So for now we want to consume both and our CMakeLists.txt for that looks like :

find_path(PAHO_MQTT_INCLUDE_DIR MQTTClient.h)
find_library(PAHO_MQTT_SYNC_LIBRARY NAMES paho-mqtt3c.lib)
find_library(PAHO_MQTT_ASYNC_LIBRARY NAMES paho-mqtt3a.lib)
SET(PAHO_MQTT_LIBRARIES ${PAHO_MQTT_SYNC_LIBRARY} ${PAHO_MQTT_ASYNC_LIBRARY})
include_directories(${PAHO_MQTT_INCLUDE_DIR})

summary

I showed to configure and build protobuf and paho lib for VS2010. I hope this gonna save someone extra time if doing the same. At the end of the day, I can use compile and link with the two libs in my own project with:

add_executable(ProtoMQTT main.cpp ${PROTO_SRCS})
target_link_libraries(ProtoMQTT ${PROTOBUF_LIBRARIES} ${PAHO_MQTT_LIBRARIES})


references / further reading
[1] https://github.com/vlovo/ProtoMQTT.git
[2] https://github.com/google/protobuf.git
[3] https://github.com/eclipse/paho.mqtt.c